Continuous integration (CI) and continuous delivery (CD) are two of the most important concepts of DevOps and form a crucial part of modern software development.
CI/CD is the practice of automatically building and testing code changes and then deploying these changes to your stack (test, staging, pre-prod, prod, etc.). CI/CD pipelines are a powerful tool that helps your teams move faster, release better software, shorten delivery times, and reduce the amount of error via automation.
In this post, we will discuss what CI/CD pipelines are and how they work; we will then take you through how to set up a sample pipeline to deploy an AWS Lambda using Terraform.
CI/CD Pipeline Basics
CI/CD performs automated tasks called pipelines or workflows. These are typically run in the cloud but can also be run using on-premises hosting (depending on your CI/CD/Git solution).
It is generally accepted that a pipeline defines a CI/CD task as it is running, or previously ran, and a workflow is the blueprint for this pipeline. For the sake of simplicity, we will use both interchangeably in this article. Most of the time, the workflow is defined in a .yml file, often hidden in a Git repository. Hence, a workflow is associated with a Git repo and will most of the time perform actions only in this repo.
The pipeline is triggered by an action such as a commit to a particular branch. A CI/CD pipeline can be run on different actions, but a common pattern is to see it on a merge/pull request and on a push.
At completion, the pipeline will deliver an exit result: success or failure. In the case of failure, this often means that the changes brought by the commit cannot be merged into the branch and that more work is needed by the author of the commit.
You can use CI/CD pipelines for many different software development projects, like a web app, mobile app, a web API, microservices, etc.
In larger organizations, CI and CD practices are often done by DevOps engineers, whereas, in smaller teams, software developers often take on these responsibilities.
What Should a CI/CD Pipeline Do?
There is no predefined rule as to what a CI/CD pipeline should do, but the following is what typically occurs in a basic CI/CD pipeline:
- A developer pushes a commit to trigger the pipeline.
- The CI/CD machine will build the code, lint, and run the automated tests (unit tests, end-to-end tests, integration tests, etc.).
- The pipeline then deploys the code to the target environment.
Depending on the setup, a CI/CD pipeline can do much more, like:
- Update infrastructure
- Update the app version
- Make some automated commits
- Be triggered as a cron job
- Update a task status in Jira or Asana
- Send notifications to the team via a third party (Microsoft Teams, Slack, etc.)
Why Is It Important to Have CI/CD?
CI/CD pipelines are very important for code projects, as they enable organizations to deliver changes more rapidly. They also increase reliability by automating what were previously manual processes executed by humans; and this reduces the risk of error. In brief, CI/CD is a tool that saves time and minimizes errors.
The Most Common Tools and Integrations
Very often, software development teams organize and track changes in their code using Git or another version tracking software. Their Git repo will typically be hosted at GitHub, GitLab, Bitbucket, etc.
With the proliferation of DevOps practices, many of these Git tools now offer CI/CD tooling, (think GitHub Actions and GitLab CI/CD). These have become some of the most-used tools for CI/CD in the industry.
Other organizations choose to integrate a remote Git repository (e.g., Bitbucket) with a dedicated, standalone CI/CD tool like Jenkins or CircleCI.
What Is Infra as Code in CI/CD Pipelines?
With the proliferation of cloud computing, infrastructure-as-code (IaC) tooling like Terraform, AWS CDK, and the serverless framework have arisen in the past few years.
These tools let organizations have the infrastructure defined as code or configuration files, which brings many benefits:
- No more manual action to handle infrastructure changes
- Reduces the risk of error and saves time by automating actions
- Allows you to quickly rebuild the infrastructure in the event of a hack or other disaster
- Provides a single source of truth for infrastructure definition
- Detects drifting
- Works with multi-cloud environments (AWS, GCP, Azure)
- Is often open-source
You can also use these tools to deploy infrastructure and code changes to test and production environments directly in your CI/CD pipeline.
Common Workflows and Design Patterns for CI/CD Pipelines
Build, Lint & Test
Automating the build-lint-test step is a must in a CI/CD pipeline. By doing this, you can ensure that every commit you want to merge to the main (master) branch will meet the minimum requirements set by the test and build process.
In the case that one of these steps fails, the pipeline itself will fail and the author of the commit will need to adjust the code change. This step is critical to be sure that no regression is deployed to production.
In addition to having it set up for every pull/merge request, you should run the build, lint, and test process on every commit.
Deploy New Code
Once the code has been approved (by a human with a pull request, and by the success of the build, lint, and test phase), it can be deployed.
New code will typically be deployed to a testing environment and then be tested by the QA team. After approval from QA, the CI/CD pipeline can deploy to the next stage (pre-prod/staging or sometimes directly to production).
Deploy Infrastructure
Deploying infrastructure in a CI/CD pipeline is a way to automate infra deployment using IaC.
It can be used to set up a brand new infrastructure or update existing ones. For example, a pipeline could run at deployment time and update the new code as well as brand new infrastructure configurations or resource instances.

Automate Your CI/CD Testing Pipeline with Bunnyshell
Bunnyshell automatically creates and manages production replica environments for dev, QA and Staging. Stay lean, release faster, grow rapidly
How to Set Up a CI/CD Pipeline for an AWS Lambda Function via Terraform
In this tutorial, we will show you how to build, test, and deploy infrastructure with a CI/CD pipeline. More precisely, we will use GitHub Actions to deploy an AWS Lambda in the cloud using Terraform.
Basic Requirements
To do this tutorial, you will need to have the following:
A GitHub Account
GitHub is the most popular Git repository service. This is where we will be hosting our code. Also, GitHub added the GitHub Actions service a few years ago, which serves as a CI/CD platform directly integrated into the GitHub repository. This comes in handy, as it allows us to use a single tool to achieve two tasks.
An AWS Account
We will be using AWS as our cloud infrastructure provider, as well as the AWS Lambda service.
Lambda functions are functions as a service (FaaS) that are available with AWS Lambda, GCP Cloud Functions, Azure Functions, and many more. They allow developers to focus on delivering code for a function while letting the cloud provider handle the infrastructure. Usage of FaaS is typical in serverless architecture and microservice applications.
In order to successfully follow this tutorial on your own, you will need to have some AWS rights to be able to create infrastructure. The tutorial assumes you have these rights; for instance, an admin user can easily complete this tutorial. For more information, check out AWS IAM documentation.
Basic Knowledge of Git and Bash
It is assumed that you have basic knowledge of Git and Bash, so not every Git/Bash command will be listed line by line.
Step 1: Setting Up the GitHub Repository
Log in to GitHub and create a repository to put your code in; it will also run your pipelines.
First, you need to fetch your API key and API secret access key from AWS. Browse your AWS account, and at the top right under your username, select Security Credentials. This will bring you to the page seen below.
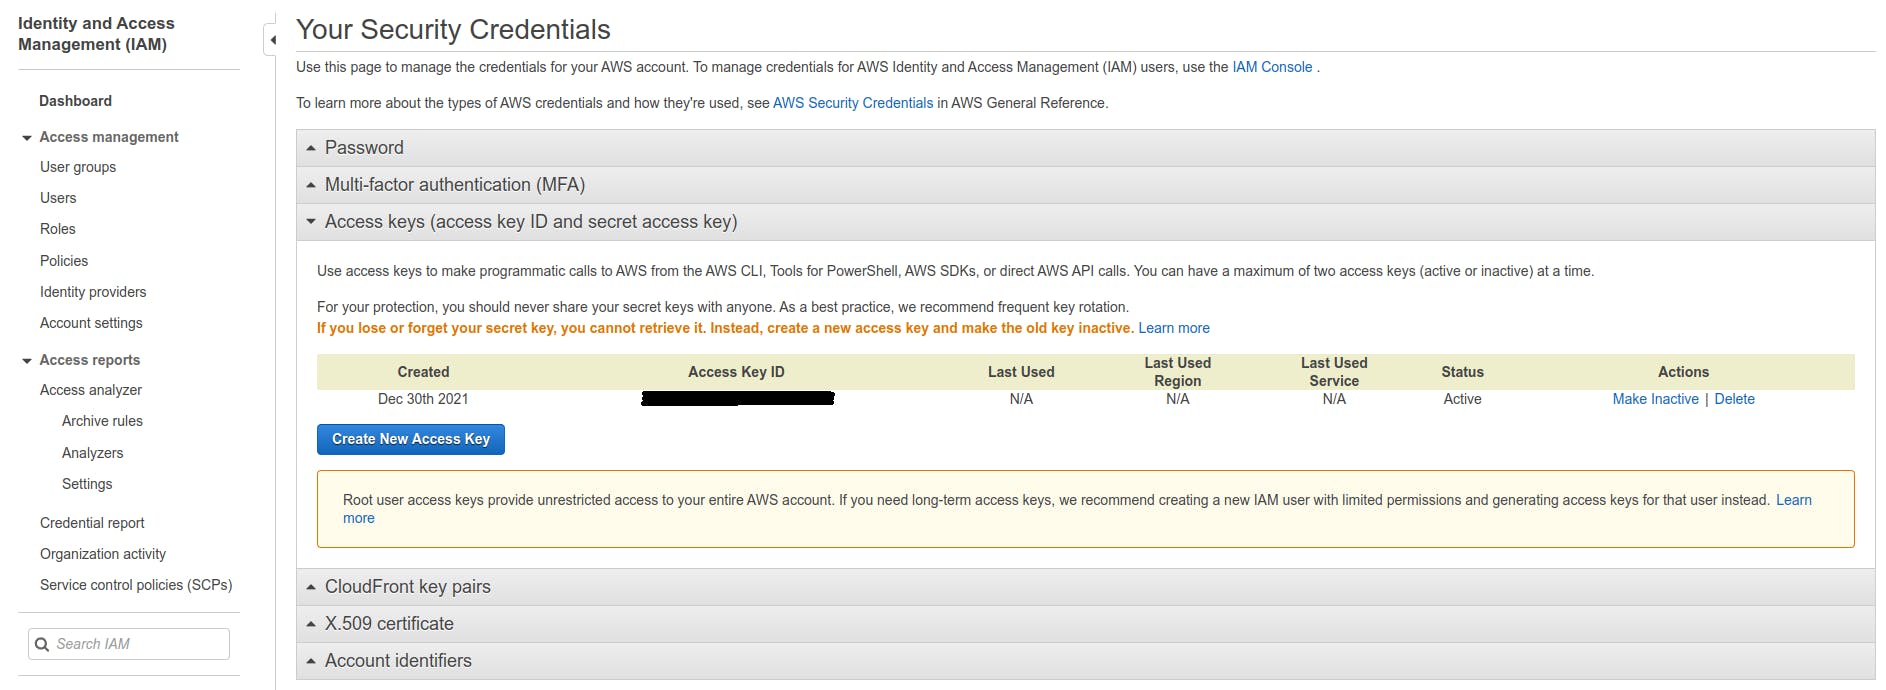
Under Access Key, click on Create New Access Key or use an existing one. Be sure to save the values generated in a safe place.
Next, you need to be granted access to AWS to update the Lambda code. For this, you will use an acces_key_id and a secret_access_key set as repository secrets.
In the GitHub repo, go to the Settings tab. On the sidebar, click on Actions under Secrets. We will set the values there; see the following screenshot for reference.
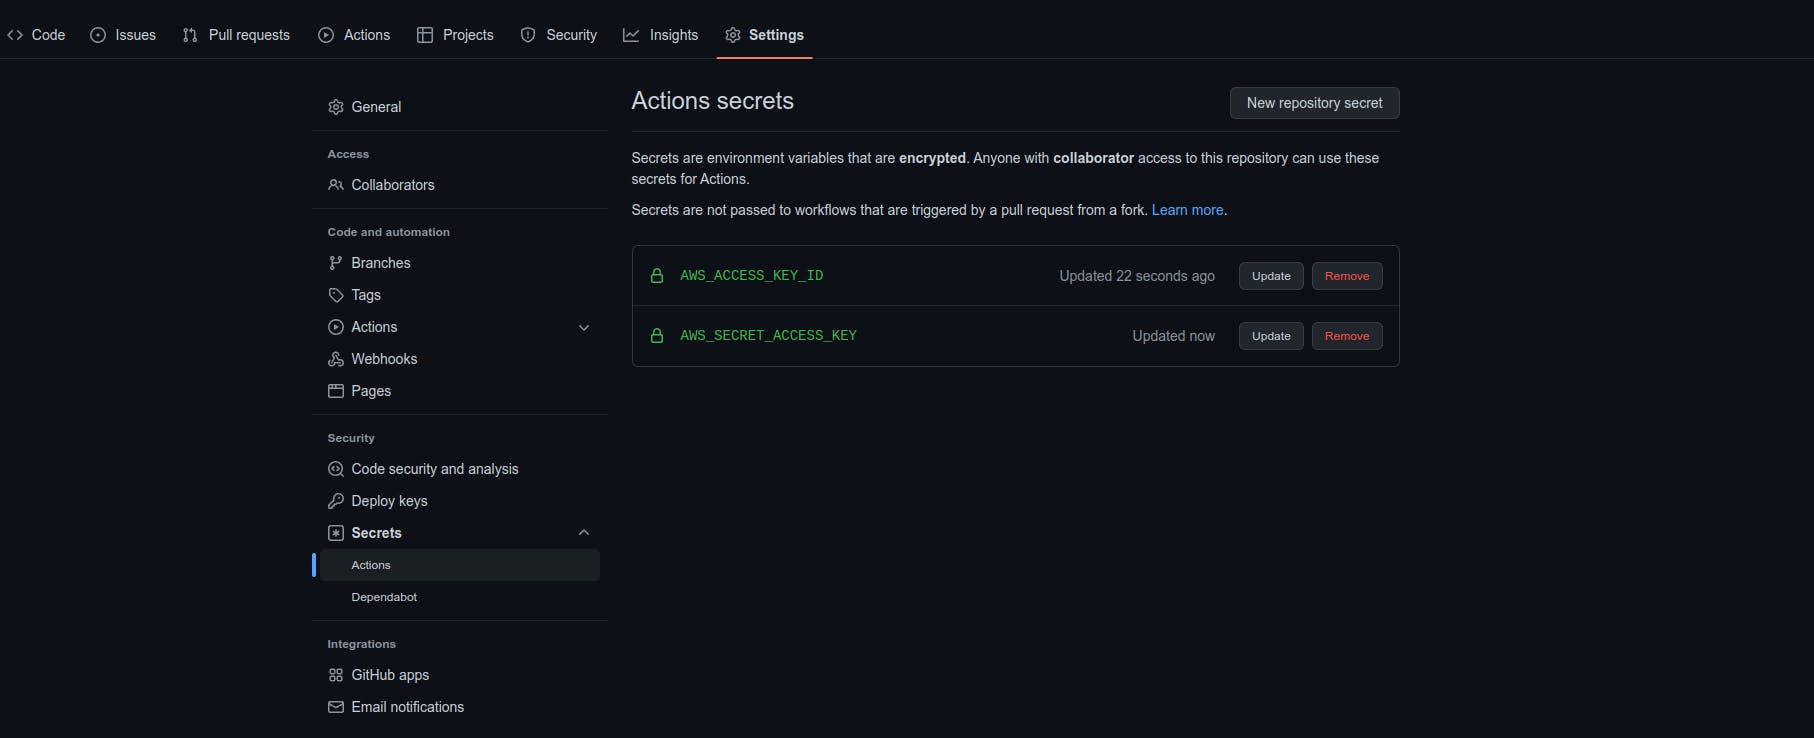
Note: The access key and access key ID are set as encrypted secrets because of their highly confidential nature. Never share this information with anyone. If you believe someone else might have these keys, you should invalidate and regenerate new ones in AWS.
Step 2: Writing the Lambda Function
You can write your Lambda function using a wide range of languages; Node.js, Python, and Go (Golang) are a few of the most popular. For this example, we’re using Go due to its rising popularity with backend developers.
In order for the function to run, it needs to be triggered by an event, like a message from SQS or API Gateway. Lambda functions can also be triggered manually. Since this article focuses on CI/CD and deploying code to the cloud, and not on the Lambda function itself, the trigger will be omitted in the Terraform configuration.
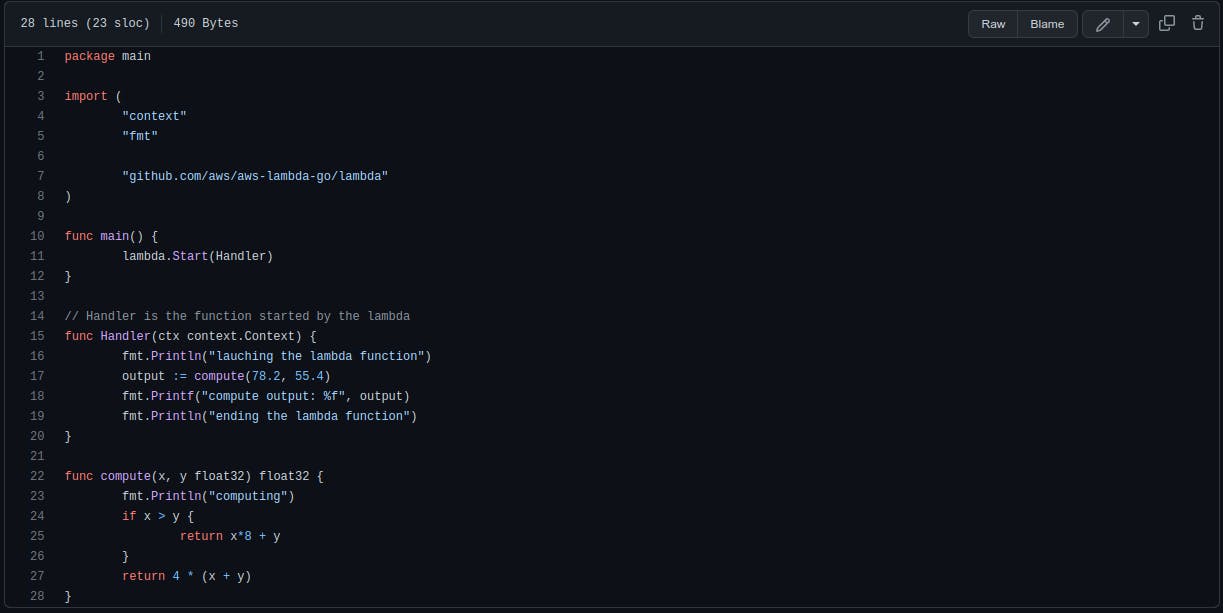
The Lambda code resides in the main.go file at the root of the repository. In a Lambda function, the entry point is what is called a handler. When your function is run, this is where (most of the time) everything starts.
In the code snippet below, the handler simply calls a function named computethat does some irrelevant computing and then prints the output.
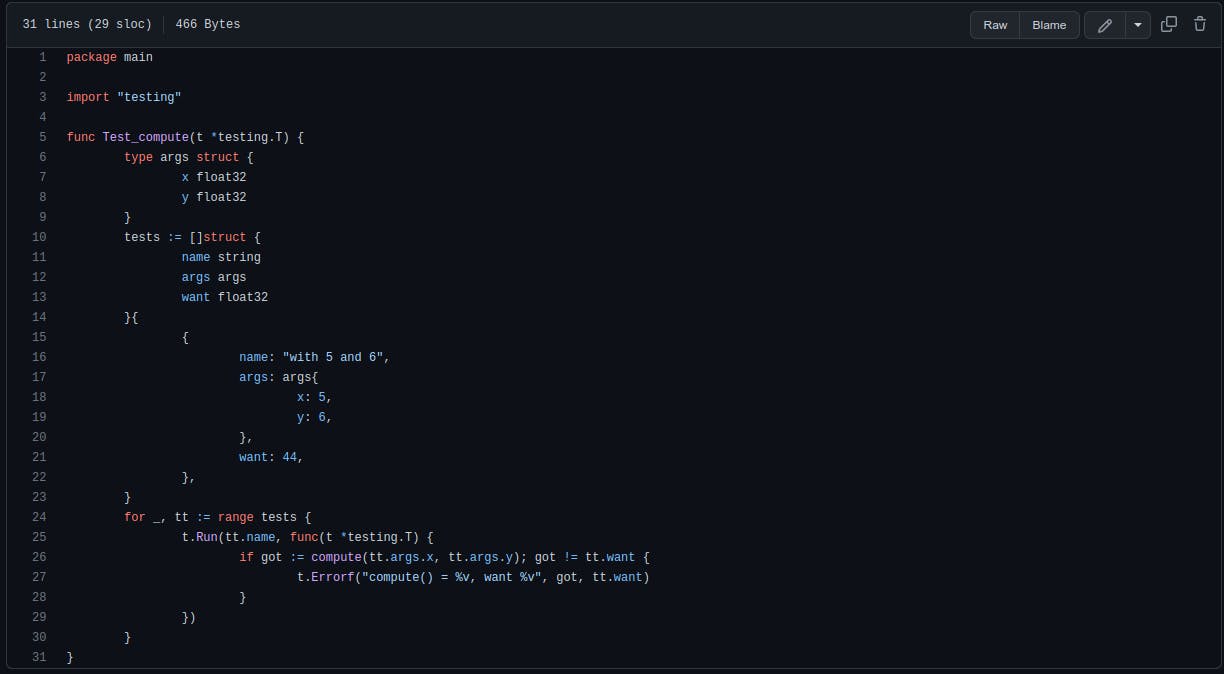
The Unit Test
A simple unit test is added in the file main_test.go at the root of the repository that will be run in the pipeline. It tests one input group for the function compute, as seen below. The test is simple and is meant to demonstrate the test step in the pipeline.
The other files, go.mod and go.sum, simply describe external dependency requirements. They are autogenerated by the go tools.
Make sure to commit and push the main.go, main_test.go, go.mod and go.sum files.
Step 3: Defining the Infrastructure with Terraform
Terraform is probably the most popular out of all the IaC tools. It comes in two variants:
- Terraform HCL, similar to a configuration file
- Terraform CDK, actual code that can be TypeScript, Python, etc.
They both produce the same output and result. Since HCL is more popular, we’ll go with HCL for this use case.
The configuration related to Terraform resides in the main.tf file. If you need to work with Terraform in a directory locally, you will need to run the command terraform init.
The file main.tflooks like this:
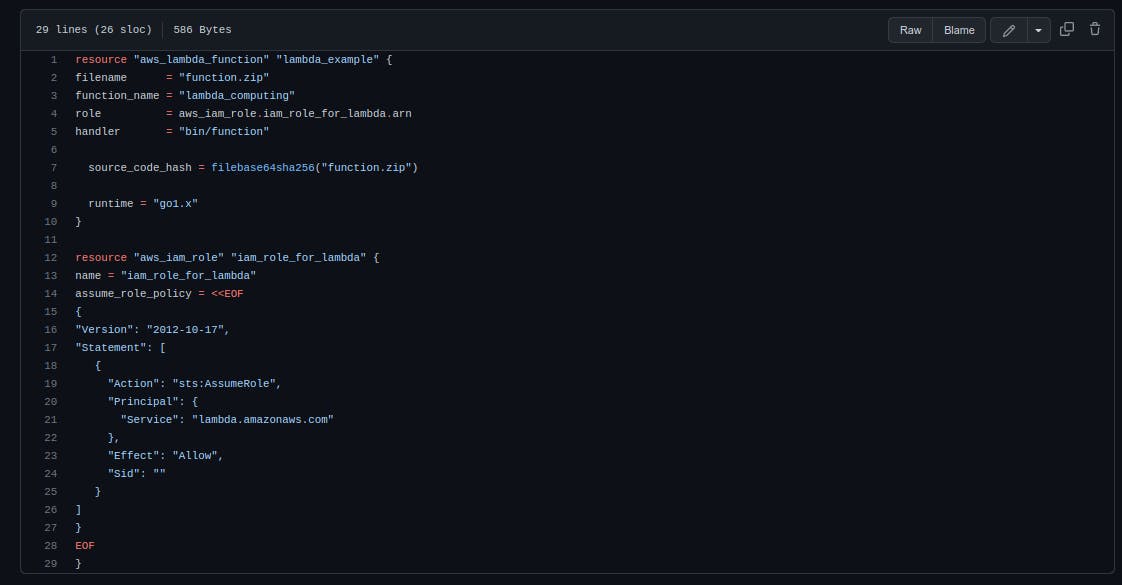
The file is divided into two sections and defines our infrastructure. First, we instantiate an aws_lambda_function. This is the code defined in the main.go file. We choose the name and set the runtime to go1.x.
Second, the Terraform file contains the policy for the function role. Note that this could be in a separate file.
The handler is set to bin/function, which is the location of the binary built by our CI/CD.
Step 4: Writing the Workflow
This is the core of the tutorial. The workflow is defined in the file build_test_deploy.yml of the subfolder .github/workflows. GitHub workflows are divided into jobs and steps. One of the main differences is that two jobs can be run in parallel, but two steps cannot.
For the sake of simplicity, in this example, we will run all steps in order, without concurrency. But steps like lint and testing can be easily run in parallel to speed things up!
The steps of the workflow are the following:
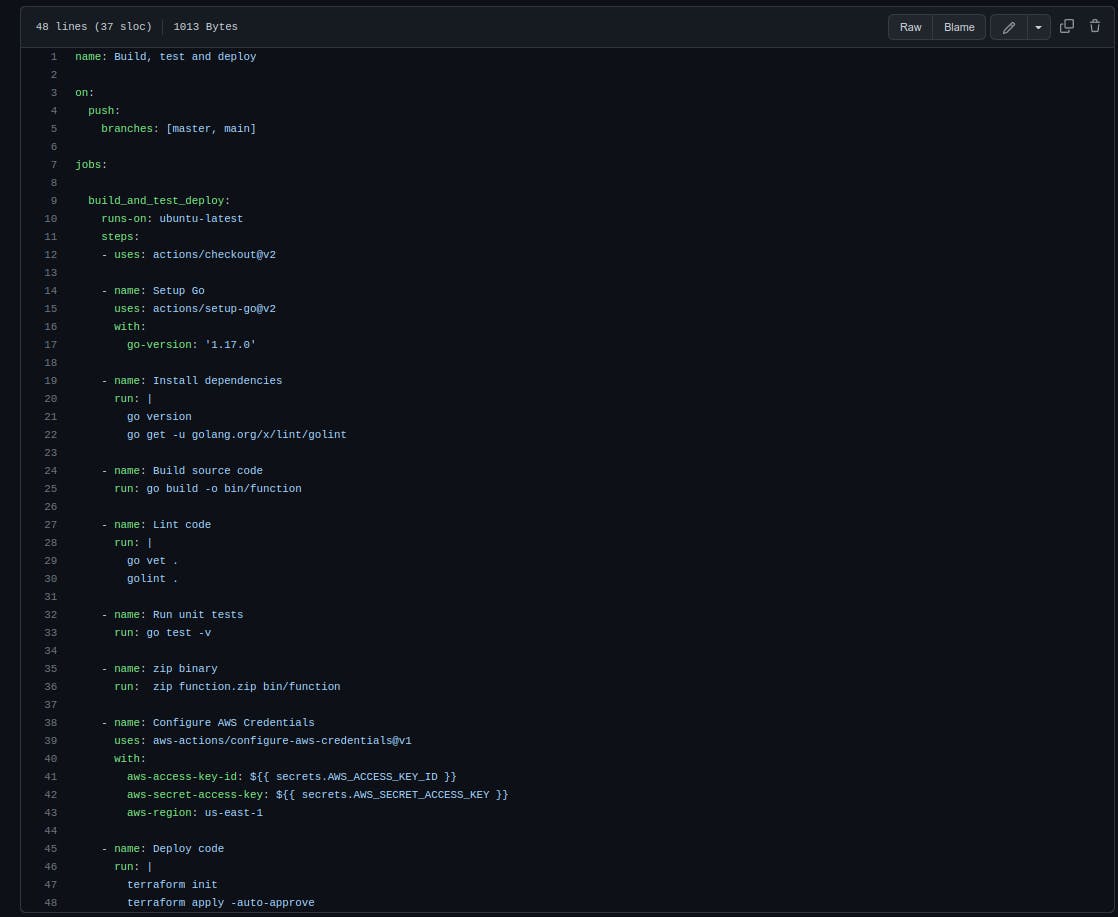
Let's examine this file more closely.
Line 1: The name of the workflow; you can select any representative name you like.
Lines 3-5: This is the event that will trigger the workflow; here, it is on every push on the master or main branch.
Lines 9-10: The name of the workflow (build_and_test_deploy), and the machine it runs on (ubuntu-latest).
Lines 11-12: This simply checks out the repo. Action/checkout represents a GitHub action that is basically a reusable and open-source module of a workflow.
Lines 14-22: This simply sets things up for Go 1.17.0 and install the linter we will use.
Lines 24-26: Here, we build the code and save the output binary to the file bin/function; if the code won’t compile, the pipeline will fail and no new code will be deployed.
Lines 27-30: We lint the code for syntax errors; if any errors are found, the pipeline fails.
Lines 32-33: This runs the unit tests; if one or more tests fail, so does the pipeline.
Lines 35-36: So far so good; the code compiles, and the test and lint pass. Now we take the binary and zip it to function.zip.
Lines 38-43: We use an action to read the secrets we previously saved to GitHub. We also set the region to us-east-1, since this is where we want to deploy the code.
Line 35: In this last step, we let Terraform run our main.tf file for deployment. Using the credentials provided in the last step, Terraform will connect to AWS and update the Lambda with any new configuration we passed (for instance, we could change the function name, the triggers, etc). Finally, it uploads the infrastructure and the code.
Step 5: Running the Workflow
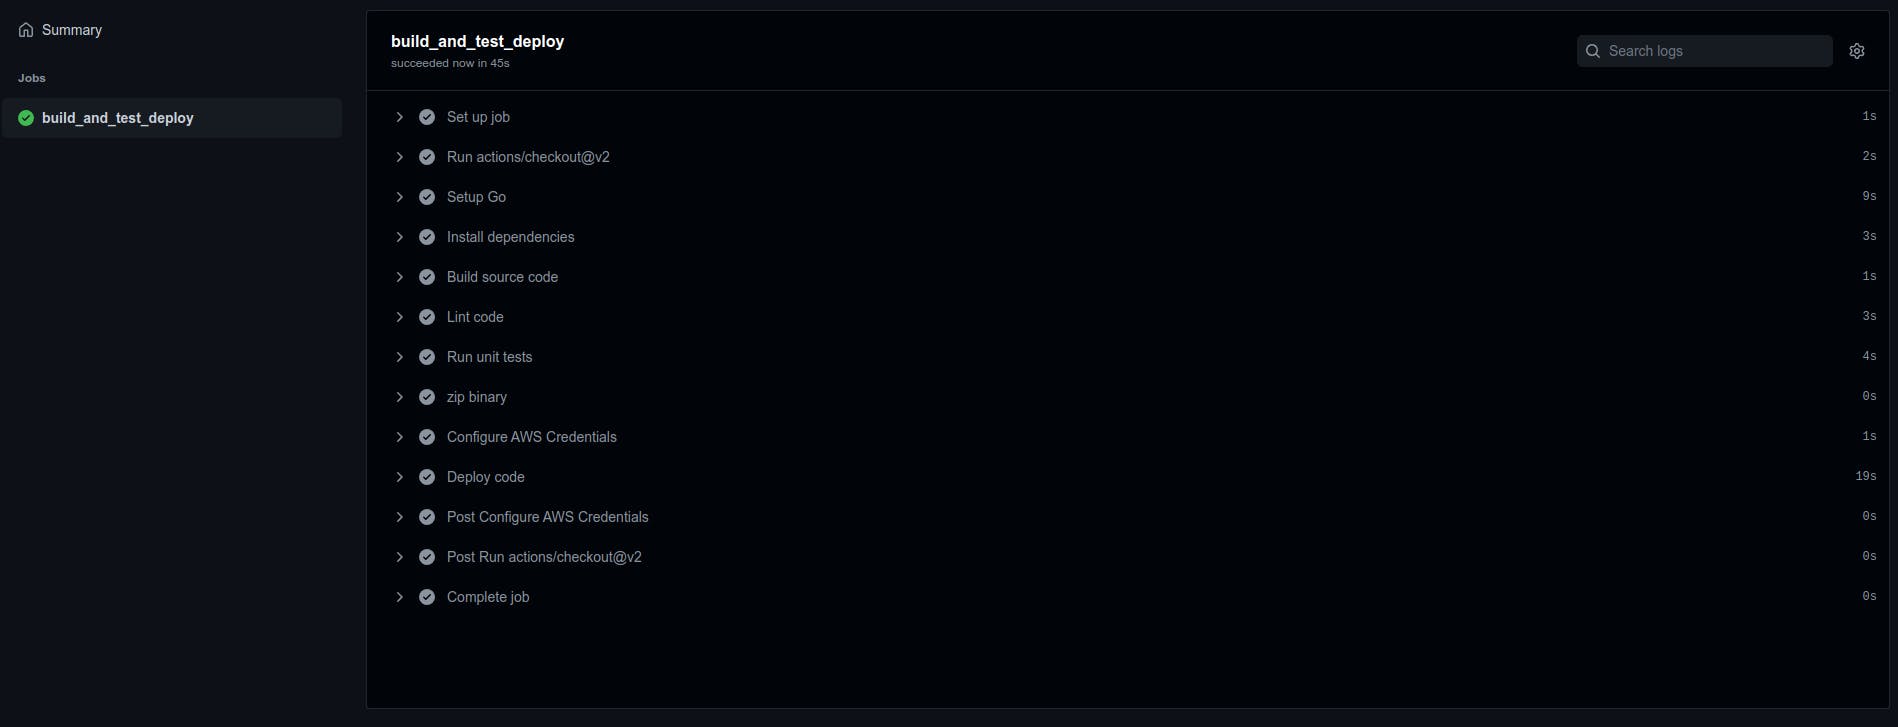
With all that set up, committed, and pushed to the repo, we should be able to look at the GitHub Actions pipeline. GitHub will automatically check for files in the subfolder .github/workflows and run the pipeline according to the definition. If you have a similar setup, check in your repo under Actions, and you should see the workflows that have run.
Now, every time someone pushes to your repo on the main/master branch, this pipeline will run.
The output summary of your GitHub Actions pipeline can be seen here, with all the steps as defined in the .yml workflow file.
Next, check in AWS, and the new code should be deployed!
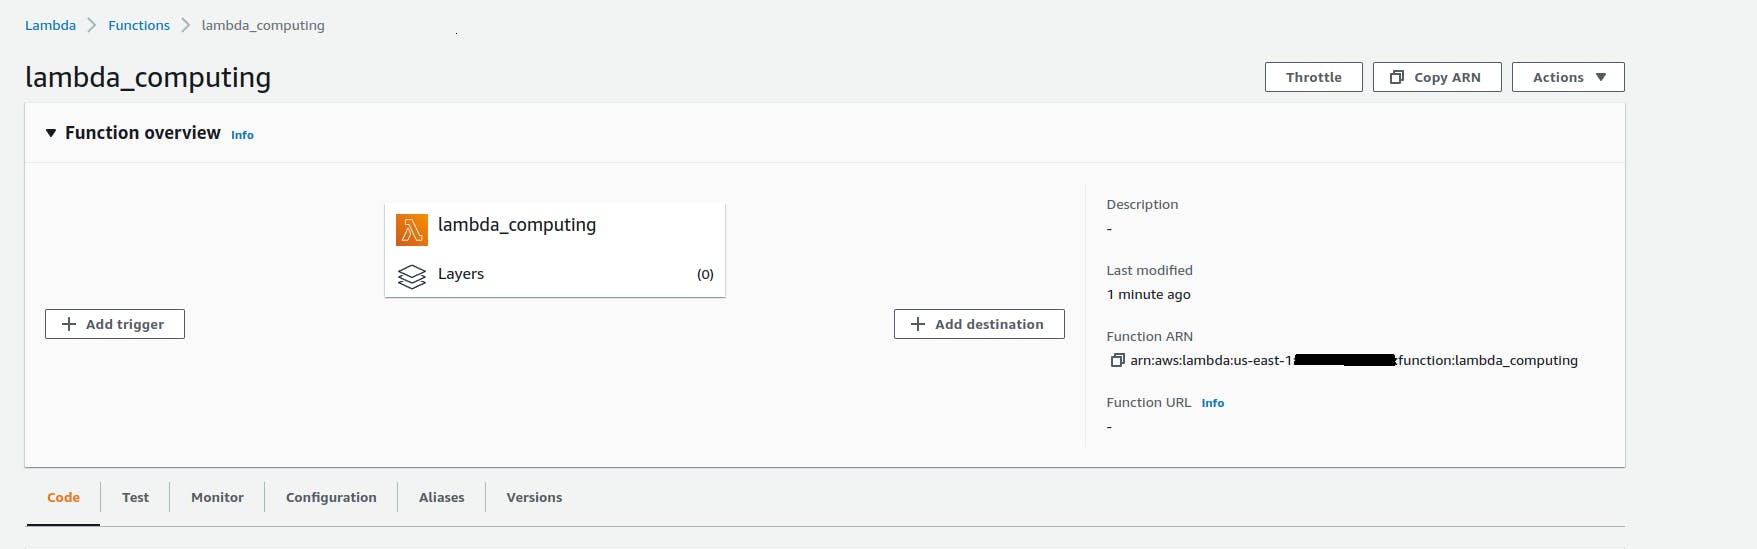
As you can see, it was updated 1 minute ago. You can hit the test function button in AWS with a dummy input, and in the next image, you will see the logs from your code.

Summary
CI/CD is a powerful tool that every organization needs to embrace in order to frequently deliver high-quality software. It is very useful to build, test, and deploy new code and infrastructure. The main benefits are that it reduces the risks involved in code deployment by automating tasks, which also saves time.